Installing printers was always a dark side of the ICT. Managing a couple of printers and some users can be a challenge but managing tens or hundreds of printers and users is a nightmare. Users need to open a ticket so someone from helpdesk can connect and install the driver which requires an elevated access. Ensuring that all the helpdesk agents are using the same printer name, printer port name or settings is something that can't be assumed as we are all humans.
Microsoft's take to this challenge is Universal Printing. Using Universal Printing the print job is sent from your computer to a Microsoft datacenter where it is processed then sent back to the printer which most of the times is within reach. As we can't break the laws of physics this process will add latency and Internet traffic which can reach gigabytes. I think this is stupid. Not to mention that advanced printing features are not supported yet.
So, we need to get back to the "legacy" way of using printers. We can install printers using PowerShell as a stand-alone script, PowerShell as an Intune script or PowerShell as an Intune App.
The below will show how to deploy printers using an Intune App that will be available in Company Portal. Users will be able to install or uninstall printers without the need for an elevated access. I will not touch on the tenant setup and licensing.
To install a printer to a Windows device we need to take the below actions. Packing everything in an Intune App is shown after.
- acquire driver files
- add the driver to the Driver Store with PnPUtil
- create a printer port
- add the printer driver
- add the printer
1. acquire driver files
Usually the driver files can be extracted from the official application. If there is a generic application for all the models you could open the .inf file specific to your model and get only the listed files for that specific model.
Another way is to actually install the driver then export the drivers using PnPUtil:
pnputil /export-driver * c:\drivers* (c:\drivers folder should exist)
After export look for your driver name folder which should contain all the needed files.
2. add the driver to the Driver Store with PnPUtil
in a CMD elevated window run the below:
pnputil /add-driver "cnlb0ka64.inf"* cnlb0ka64.inf is the driver name, will differ based on the printer you want to install
3. create a printer port
in a PowerShell elevated window:
Add-PrinterPort -Name "port name" -PrinterHostAddress "printer IP"4. add the printer driver
Add-PrinterDriver -Name "printer model from the driver"5. add the printer
Add-Printer -Name "printer name" -DriverName "printer model from the driver" -PortName "port name"For example the whole process to install a Canon iR2016 UFRII LT printer using 192.168.0.10 IP is like this:
pnputil /add-driver "cnlb0ka64.inf

Add-PrinterPort -Name "192.168.0.10" -PrinterHostAddress "192.168.0.10"

Add-PrinterDriver -Name "Canon iR2016 UFRII LT"

Add-Printer -Name "Canon iR2016 UFRII LT" -DriverName "Canon iR2016 UFRII LT" -PortName "192.168.0.10"
Now let's see how we can improve the process and deploy an Intune App.
For this process we will need the below:
- the driver files
- the PowerShell install script
- the PowerShell uninstall script
- IntuneWinAppUtil.exe to pack the files into the .intunewin file
- creation of the Intune App
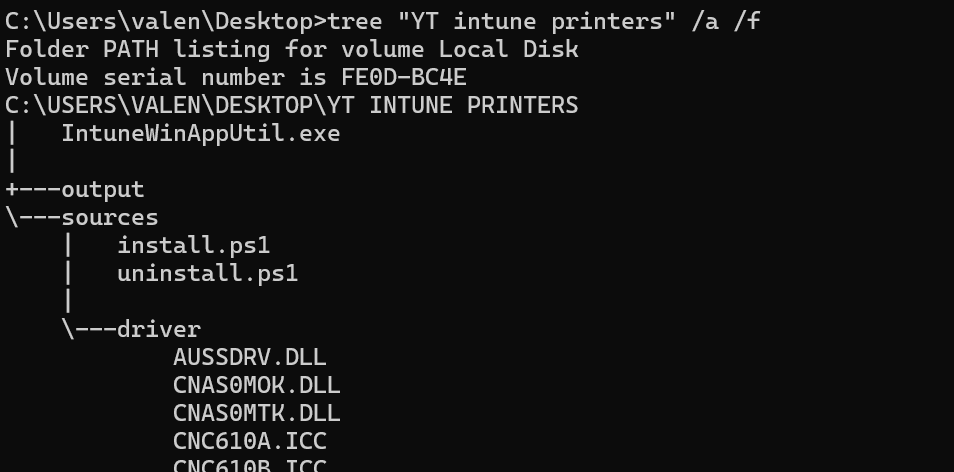
Create a folder for this process. Save the IntuneWinAppUtil.exe inside. Create two new folders inside, like "in" and "out" or "input" and "output" etc. I will use a "sources" folder for the "input".
Put the driver files inside the input folder. You can put them direct in the root or create a subfolder like "driver". In this example I will use a "driver" folder inside the "sources" folder.
I am using "YT Intune printers" to store the files needed so the structure is like below:
Now let's create the install and uninstall scripts based on the steps from the first part. Both scripts are using hard-coded details and both need to have the same settings for the process to work properly.
install.ps1
$printerName = "CanoN HR dept."  # for example: Canon IR2520 HR Dept
$driverINF = "cnlb0ka64.inf" # for example: cnlb0ka64.inf (inf file should be under driver folder)
$driverPrinterModel = "Canon iR2016 UFRII LT" # for example: Canon iR2016 UFRII LT
$printerPortName = "Canon HR"
$printerPortIP = "192.168.0.10" # IP address of the printer

Start-Process PNPUtil -ArgumentList "/add-driver", "driver\$driverINF"

# check for printer port
if (Get-PrinterPort -Name "$printerPortName" -ErrorAction SilentlyContinue)
{
    Get-Printer | Where-Object { $_.PortName -eq "$printerPortName" } | Remove-Printer
    Remove-PrinterPort -Name $printerPortName
}

Add-PrinterPort -Name "$printerPortName" -PrinterHostAddress "$printerPortIP" -ErrorAction SilentlyContinue
Add-PrinterDriver -Name "$driverPrinterModel"
Add-Printer -Name "$printerName" -DriverName "$driverPrinterModel" -PortName "$printerPortName"
uninstall.ps1
$printerName = "CanoN HR dept."  # for example: Canon IR2520 HR Dept
$driverINF = "cnlb0ka64.inf" # for example: cnlb0ka64.inf (inf file should be under driver folder)
$driverPrinterModel = "Canon iR2016 UFRII LT" # for example: Canon iR2016 UFRII LT
$printerPortName = "Canon HR"
$printerPortIP = "192.168.0.10" # IP address of the printer

Get-Printer | Where-Object { $_.PortName -eq "$printerPortName" } | Remove-Printer
Remove-PrinterPort -Name $printerPortName
Remove-PrinterDriver -Name "$driverPrinterModel"
With the scripts created we can now start packing everything into the intunewin file needed for Intune.
Open an elevated PowerShell, change the location to the folder where you have the files, in my case it is "YT Intune printers". Run IntuneWinAppUtil.exe and follow the guide, in the end you will have the intunewin file.

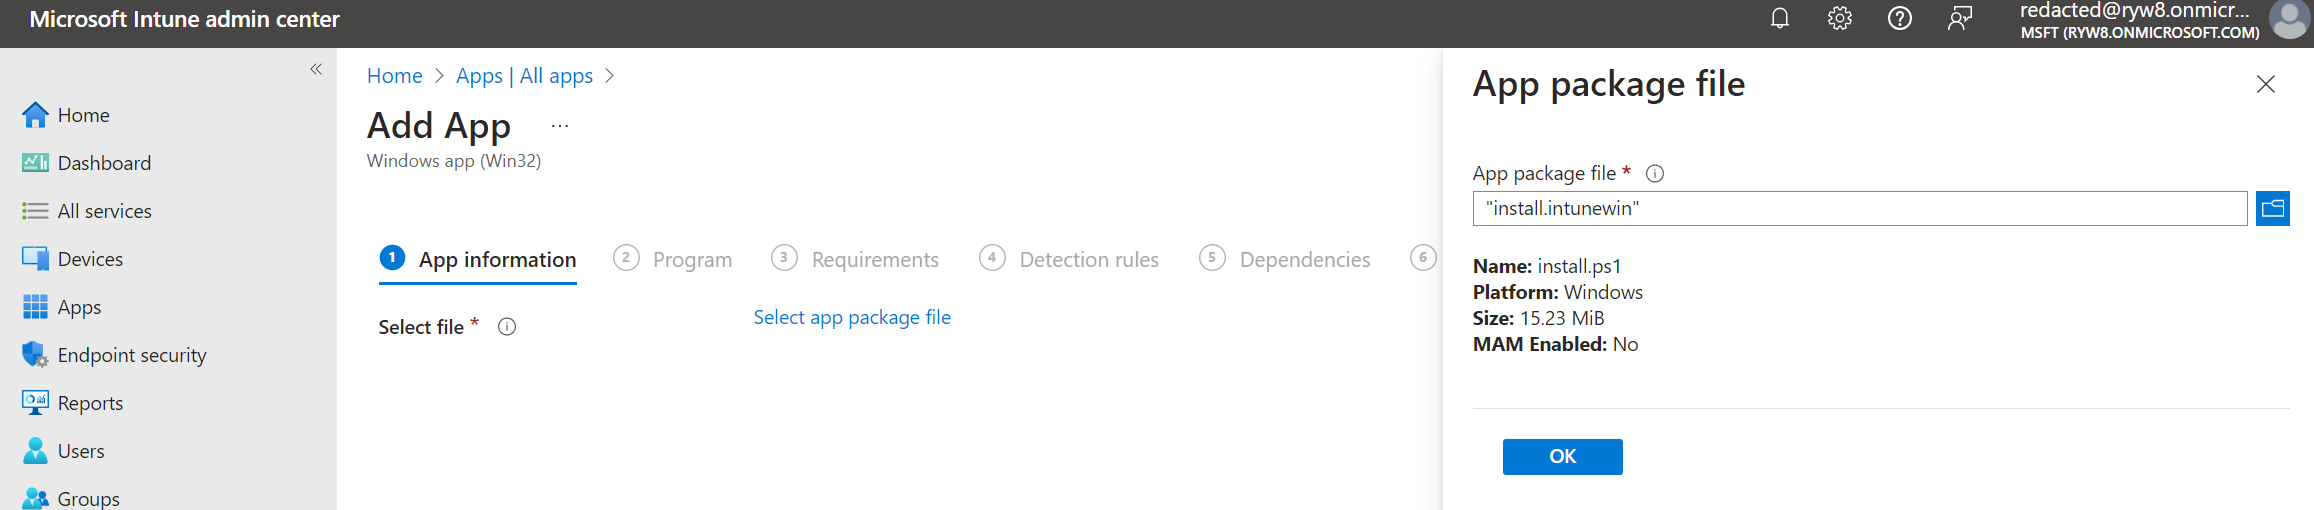
If everything works fine you will have an install.intunewin file in the output folder.
Now let's go to Intune portal to create the app. The app will be a Windows app (Win32).

Upload the package:
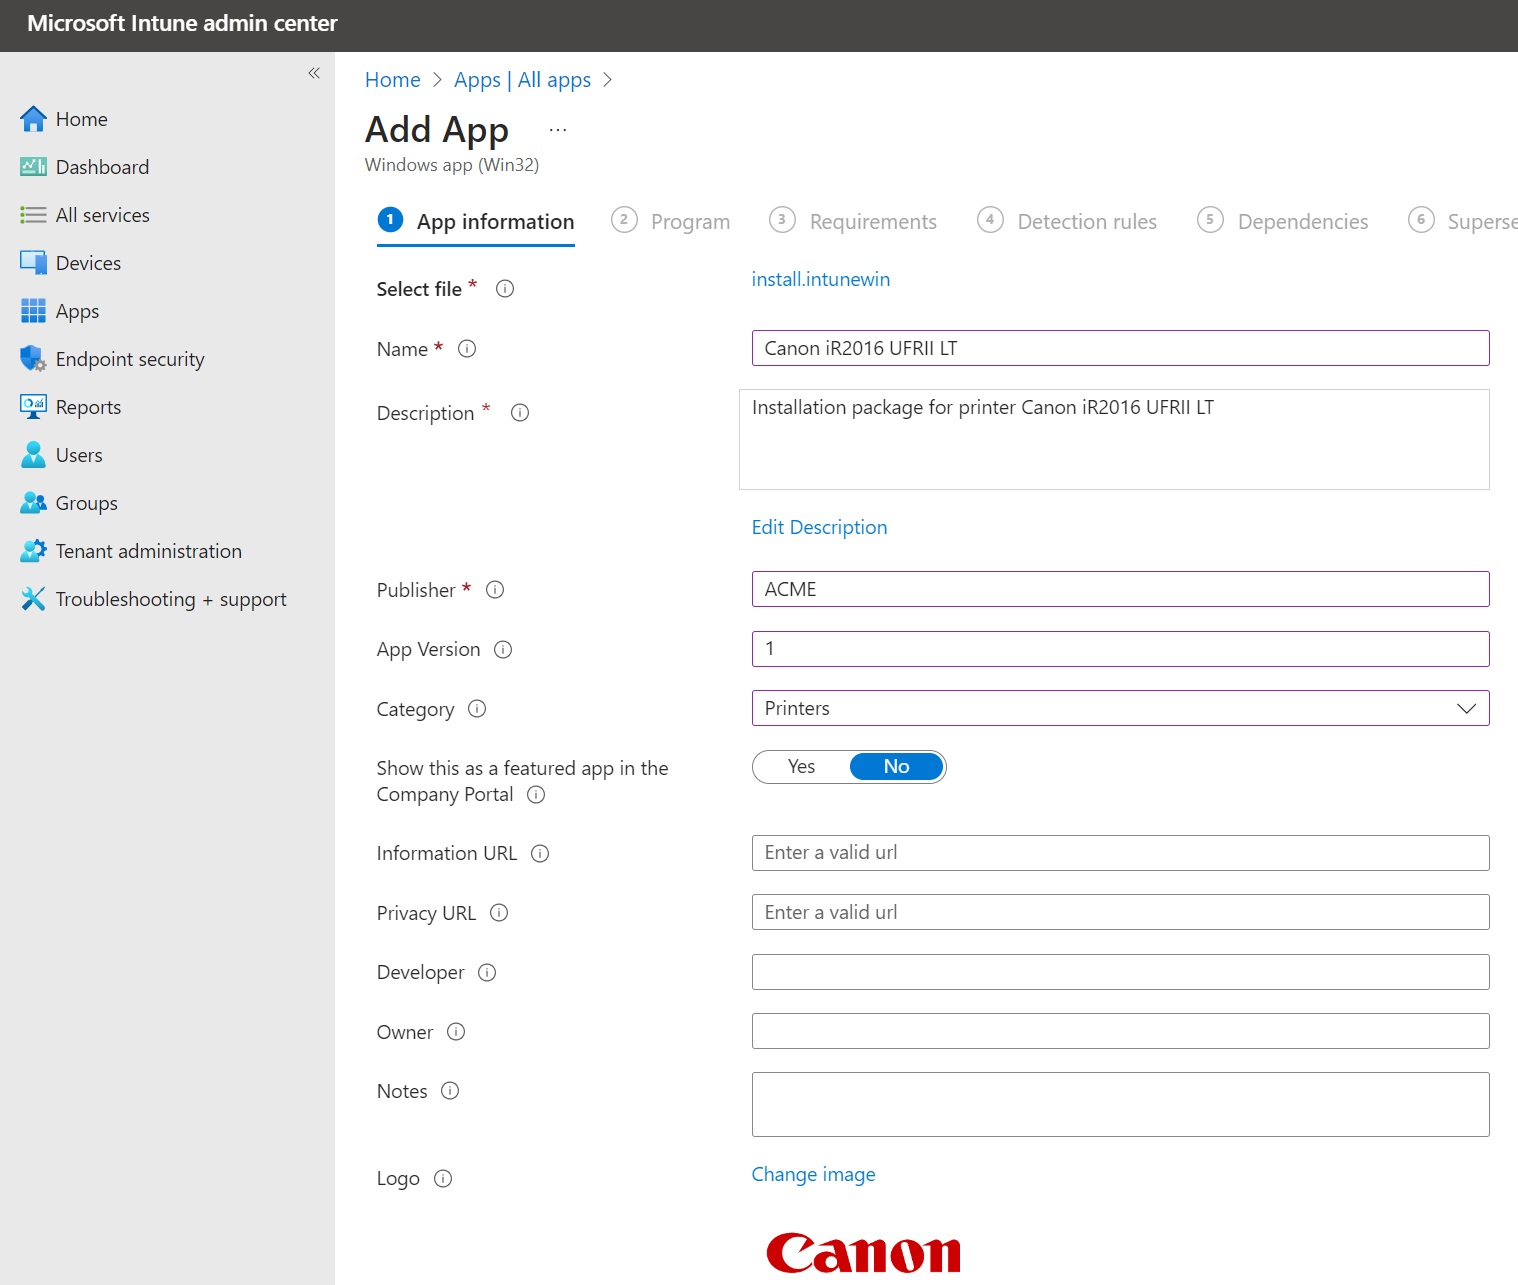
Fill in the proper details:
Install command:
%SystemRoot%\SysNative\WindowsPowershell\v1.0\PowerShell.exe -noprofile -ExecutionPolicy ByPass -File .\install.ps1Uninstall command:
%SystemRoot%\SysNative\WindowsPowershell\v1.0\PowerShell.exe -noprofile -ExecutionPolicy ByPass -File .\uninstall.ps1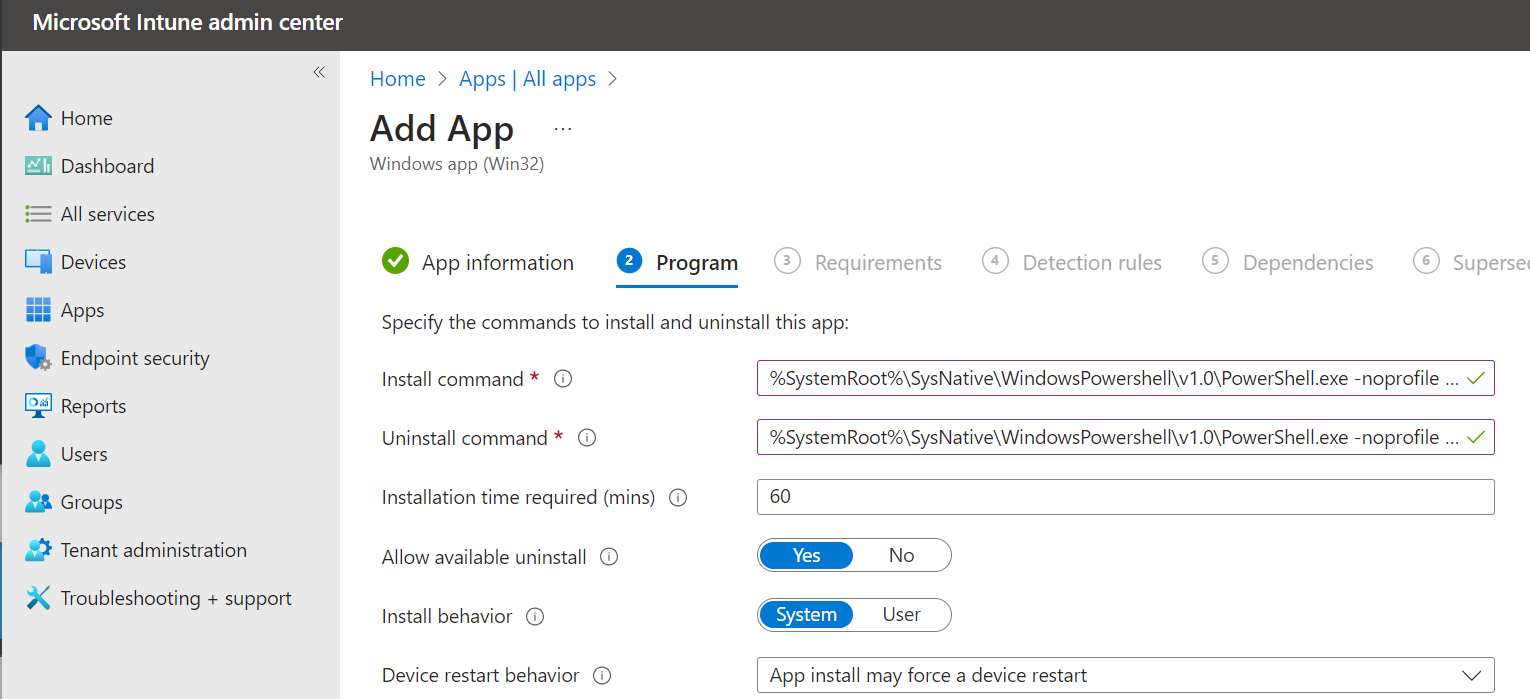
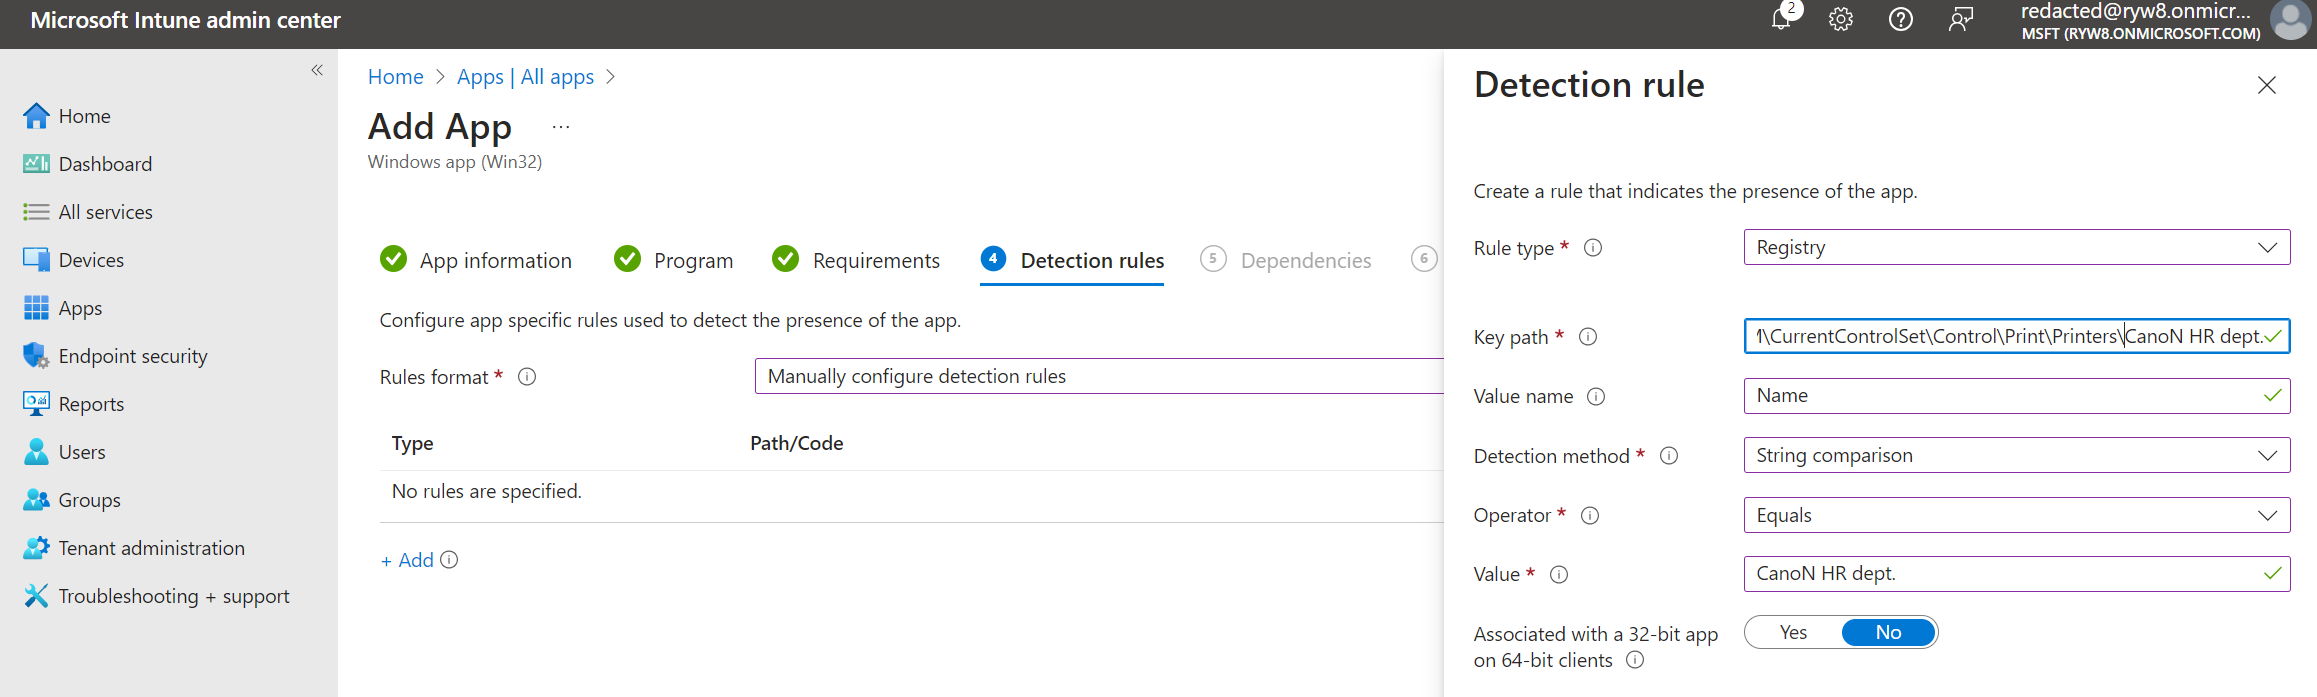
Detection rules - be careful to use the exact printer name from the install.ps1 and uninstall.ps1 (in this case is "CanoN HR dept." and you need to put the value in Key path and in the Value fields.
The registry path is HKEY_LOCAL_MACHINE\SYSTEM\CurrentControlSet\Control\Print\Printers\printer_name
Assign the app to users/devices as needed. After a couple of minutes you can see the app in Company Portal.
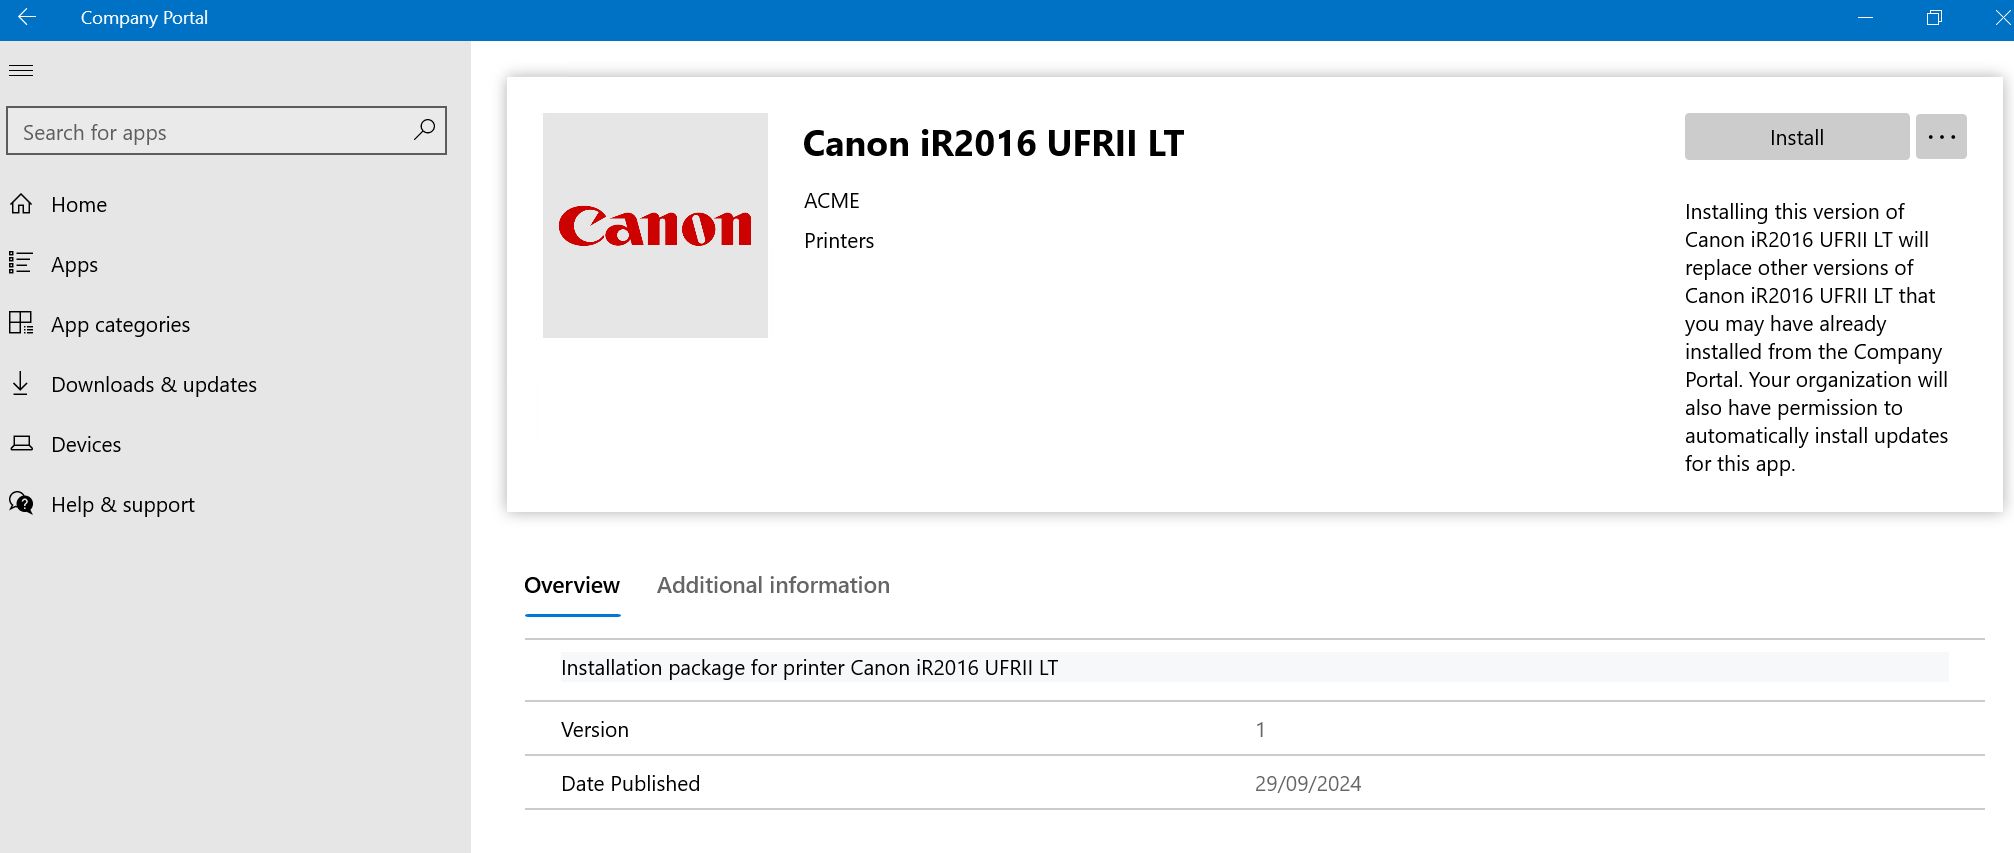
Click on Install and the printer should appear in the printers list:

Using this method to deploy printers avoid the overhead of requests to helpdesk, it is faster and a better experience for the end-user.
Project available on GitHub.
Featured image created with Grok.
